
使用ztncui配置私有化zerotier服务器
众所周知,Zerotier-One是一个非常好的组建虚拟局域网的工具,可以以p2p的方式穿透NAT网络进行连接。但是在使用中也仍然存在着一些瑕疵,主要就是以下两点:
- 因为Zerotier官方提供的中心节点(planet节点)全部都在国外,所以更新路由表的时候,通常会消耗较长的时间,甚至可能失败;
- 官方免费版本最多只支持1个管理员和25个节点。
我这篇博客主要就是针对以上两个问题的解决做了一些记录。
一、加速节点(moon节点)
在原本的使用中,我们每次更新路由表,都是需要连接官方的planet节点,因此我们希望使用一种类似镜像的方式,将路由表缓存到一个能够快速查询的地方,也就是下面所说的moon节点。
moon节点可以理解为多级缓存,当需要更新路由表时,leaf节点会首先请求moon节点查询,如果失败再去planet节点查询;而moon节点会将最新的路由表信息返回,如果没有最新缓存则会再去请求上级节点(moon或者planet)并返回。
创建moon节点的方式很简单,只需要在一台拥有公网ip的服务器上使用命令生成即可,步骤如下:
1、安装zerotier
# 使用官方提供的脚本一键安装curl -s https://install.zerotier.com | sudo bash2、生成moon配置文件
cd /var/lib/zerotier-onezerotier-idtool initmoon identity.public > moon.json3、在配置文件中添加公网IP地址
在moon.json文件中,roots下有一项stableEndpoints,在里面加入自己的公网ip和zerotier端口(9993),例如:
{ "stableEndpoints": ["47.102.205.100/9993"]}注意点1:填的一定是公网IP,IPv4和IPv6均可,端口默认为9993不需要更换。
注意点2:服务器防火墙需要开放9993端口(注意是UDP)。
4、使用moon配置文件生成moon签名文件
cd /var/lib/zerotier-onezerotier-idtool genmoon moon.json这一步会生成一个*.moon格式的文件,例如0000000ac535316c.moon。
5、将moon文件移动到moons目录下,并重启zerotier-one服务
mkdir /var/lib/zerotier-one/moons.dmv /var/lib/zerotier-one/*.moon /var/lib/zerotier-one/moons.d/systemctl restart zerotier-one.service至此,moon节点就算搭建好了
6、在leaf节点中导入moon
将上述生成的*.moon文件下载至本地,放到对应目录下,并重启zerotier-one服务。
Windows 系统 放在
C:\ProgramData\ZeroTier\One\moons.d\
Linux 系统 放在/var/lib/zerotier-one/moons.d/
在管理员模式下使用命令行查看
sudo zerotier-cli peers # 此命令 Windows 和 Linux 相同就可以看到自己新创建的moon节点了(role为MOON, path为自己的公网IP)
二、搭建私有服务器
官方免费版本最多只支持1个管理员和25个节点,前者倒不是很重要,但后者对于我们这些经常自己搭私服玩游戏的人来说就有点不太够用了,因此只能自建私有服务器来解决。
1、Restful API / Sockets API
Zerotier本身提供了Restful API 和主流程序语言的sdk,有兴趣的可以自行查阅文档 https://docs.zerotier.com
2、使用ztncui图形化用户界面控制
ztncui(ZeroTier Network Controller User Interface)是由key-networks开源的zerotier图形化用户界面。仓库地址:https://github.com/key-networks/ztncui,有兴趣的可以自行编译部署。
3、使用容器部署ztncui
与大多数编译安装的应用类似,编译部署ztncui也需要先安装其必备的环境、配置各项参数,并不方便。因此,我选择了云原生方式,使用Docker容器部署ztncui。仓库地址:https://github.com/key-networks/ztncui-containerized
3.1、拉取镜像
docker pull keynetworks/ztncui:latest这里我们使用latest版本号,因为与zerotier-one一样,zerotier也仍在不断迭代新版本。
3.2、启动容器
因为我们只需要使用ztncui这一个进程,所以我们将entrypoint修改为/start_ztncui.sh。
docker run -itd \
  --restart=always \
  --network=host \
  -e 'HTTP_ALL_INTERFACES=yes' \
  --entrypoint "/start_ztncui.sh" \
keynetworks/ztncui这样我们就可以通过容器启动一个ztncui服务了,访问http://127.0.0.1:3000/,初始用户名密码为 admin/password。
HTTP_ALL_INTERFACES=yes为允许从任意的ip访问ztncui服务,若仅需要127.0.0.1,则可以略去这一环境变量。
在ztncui的README中,写的是
user 'admin' with password 'password',但实测发现初始密码是有问题的,需要我们自己修改容器中的/opt/key-networks/ztncui/etc/passwd文件。以下为一个样例,对应的用户名密码为
admin/adminpassword:
{"admin":{"name":"admin","pass_set":false,"hash":"$argon2i$v=19$m=4096,t=3,p=1$vYiXnH7UOBwIyiNXfW0nZg$1GFEtcKZ/S/UgkosNb1RTfOCQrdKJbdjcRnp+H3Hv9g"}}3.3、连接本机zerotier-one服务
虽然ztncui服务启动成功了,但是他连接在一个独立的zerotier-one服务上,现在我们就需要将其连接到我们本机的zerotier-one上来。
其中有两个关键点,一是zerotier-one的TCP端口,二是zerotier-one的authtoken。
添加环境变量ZT_ADDR并挂载/var/lib/zerotier-one/authtoken.secret文件,同时我们将ztncui的配置文件挂载出来:
docker run -itd \
  --restart=always \
  --network=host \
  -v '/var/lib/zerotier-one/authtoken.secret:/var/lib/zerotier-one/authtoken.secret' \
  -v '/var/lib/zerotier-one/ztncui:/opt/key-networks/ztncui/etc' \
  -e 'HTTP_ALL_INTERFACES=yes' \
  -e 'ZT_ADDR=127.0.0.1:9993' \
  --entrypoint "/start_ztncui.sh" \
keynetworks/ztncui也可以通过docker-compose启动:
version: '3'
services:
  ztncui:
    restart: always
    image: keynetworks/ztncui
    entrypoint: ["/start_ztncui.sh"]
    volumes:
    - /var/lib/zerotier-one/authtoken.secret:/var/lib/zerotier-one/authtoken.secret
    - /var/lib/zerotier-one/ztncui:/opt/key-networks/ztncui/etc
    network_mode: host
    environment:
      HTTP_ALL_INTERFACES: 'yes'
      ZT_ADDR: '127.0.0.1:9993'
因为我们需要通过
127.0.0.1:9993来请求zerotier-one服务,因此必须将网络设置为host模式。
3.4、建立一个网络并加入
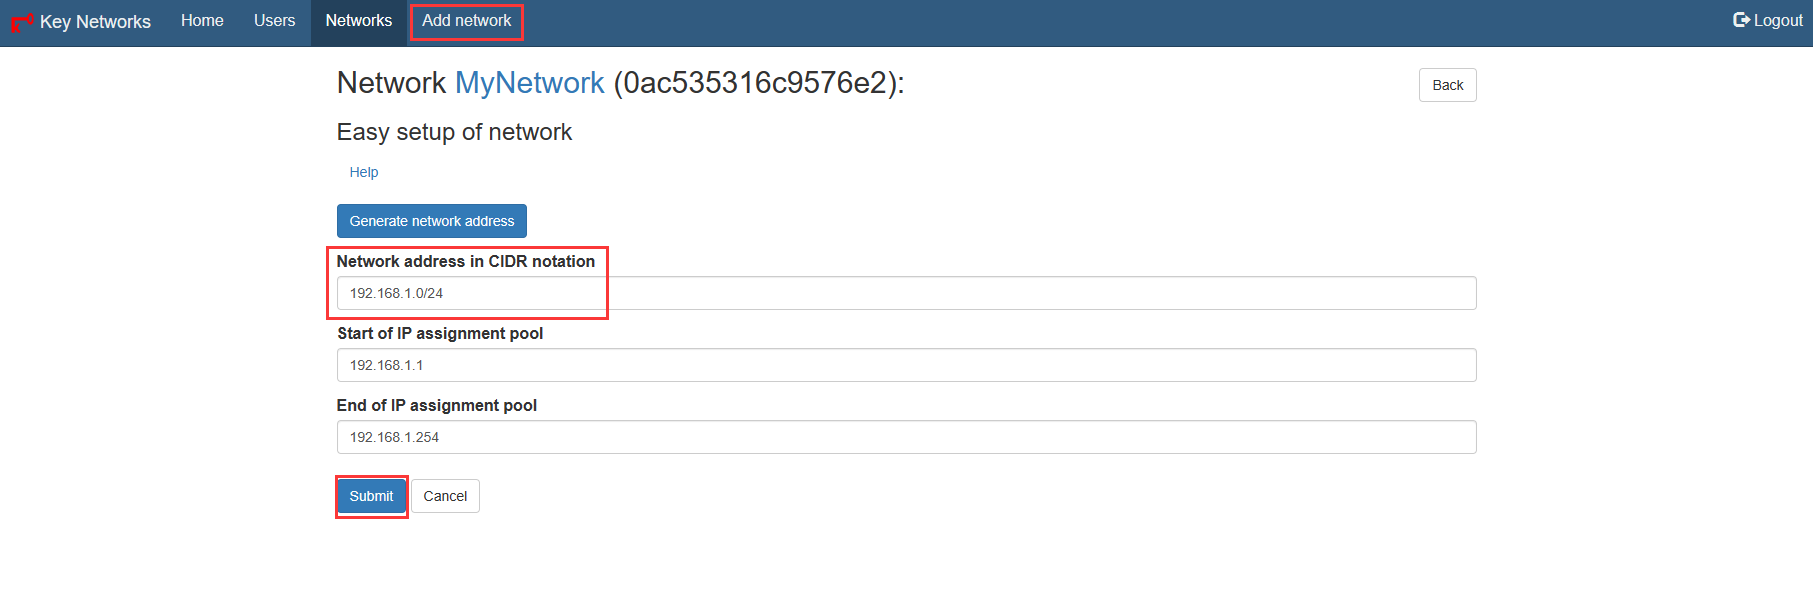
(1) 登录后点击 “Add network” 添加一个网络,点击 “Easy setup“,配置网段和子网掩码,例如192.168.1.0/24,会自动生成可用的IP地址范围,点击提交即可,如图:
(2) 获取网络ID,并在客户端加入网络:

sudo zerotier-cli join 0ac535316c9576e2(3) 勾选Authorized授权加入网络,可以自动或手动分配IP地址: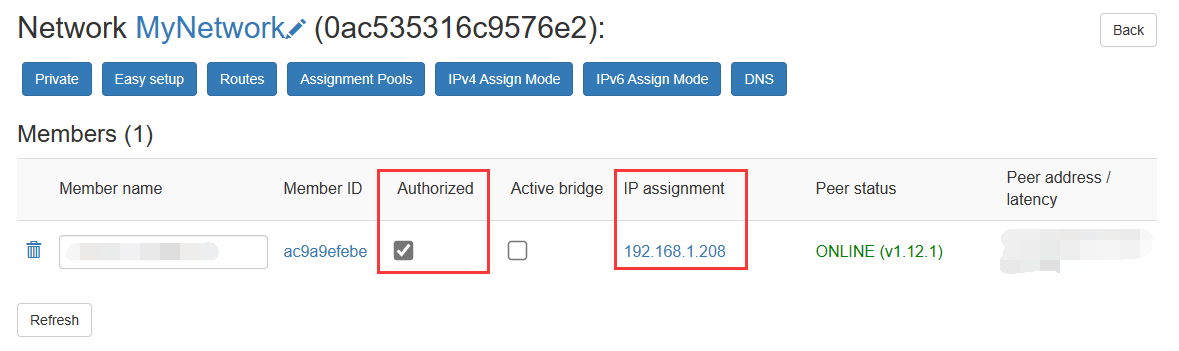

(4) 此时,该网络下的两台机器就可以使用分配的虚拟IP地址进行通信了。
三、Self-Hosting 根节点
该部分非必要,且操作较为复杂,如果没有相关需求就可以结束阅读了。
基于前两步,我们搭建了一个私有zerotier服务器,但其实它依然从属于官方的根节点。
这里需要讲到zerotier中的几种节点类型:
(1) leaf,叶子节点,这就是我们加入网络的各个机器;
(2) moon,月亮节点,也就是我们自建的缓存镜像的服务器;
(3) planet,行星节点,这就可以理解成是整个网络的根节点了。
当一个leaf节点连接另一个leaf节点时,实际上它需要去获取对方真实的ip地址,并将虚拟ip与之对应,这就存在一个路由表,如同arp表将ip地址与mac地址对应一般。
当zerotier路由表需要更新时,leaf节点首先请求moon节点,如果失败则直接请求planet节点,而moon节点也是需要请求planet节点去更新路由表的。
因此,我们前面建立的服务器仍然会去请求官方的planet节点了。如果我们希望建立一个完全独立于官方的私有服务器,就需要建立自己的根节点(planet节点)。
完整文档:https://docs.zerotier.com/self-hosting/introduction/
1、如何建立根节点
建立根节点分为两步:(1)服务器脱离官方网络;(2)叶子节点加入私有根节点。
首先,就需要创建自己的planet文件。这里我们不需要使用任何的第三方脚本,直接使用官方仓库自己编译就行。仓库地址:https://github.com/zerotier/ZeroTierOne
2、下载仓库并修改相关源码
git clone https://github.com/zerotier/ZeroTierOne
cd ZeroTierOne/attic/world
cat mkworld.cpp可以看到在mkworld.cpp文件中配置有4个官方的根节点,分别位于洛杉矶、迈阿密、阿姆斯特丹和东京:
std::vector<World::Root> roots;
// Los Angeles
roots.push_back(World::Root());
roots.back().identity = Identity("3a46f1bf30:0:76e66fab33e28549a62ee2064d1843273c2c300ba45c3f20bef02dbad225723bb59a9bb4b13535730961aeecf5a163ace477cceb0727025b99ac14a5166a09a3");
roots.back().stableEndpoints.push_back(InetAddress("185.180.13.82/9993"));
roots.back().stableEndpoints.push_back(InetAddress("2a02:6ea0:c815::/9993"));
// Miami
roots.push_back(World::Root());
roots.back().identity = Identity("de8950a8b2:0:1b3ada8251b91b6b6fa6535b8c7e2460918f4f729abdec97d3c7f3796868fb02f0de0b0ee554b2d59fc3524743eebfcf5315e790ed6d92db5bd10c28c09b40ef");
roots.back().stableEndpoints.push_back(InetAddress("207.246.73.245/443"));
roots.back().stableEndpoints.push_back(InetAddress("2001:19f0:9002:5cb:ec4:7aff:fe8f:69d9/443"));
// Tokyo
roots.push_back(World::Root());
roots.back().identity = Identity("34e0a5e174:0:93efb50934788f856d5cfb9ca5be88e85b40965586b75befac900df77352c145a1ba7007569d37c77bfe52c0999f3bdc67a47a4a6000b720a883ce47aa2fb7f8");
roots.back().stableEndpoints.push_back(InetAddress("147.75.92.2/443"));
roots.back().stableEndpoints.push_back(InetAddress("2604:1380:3000:7100::1/443"));
// Amsterdam
roots.push_back(World::Root());
roots.back().identity = Identity("992fcf1db7:0:206ed59350b31916f749a1f85dffb3a8787dcbf83b8c6e9448d4e3ea0e3369301be716c3609344a9d1533850fb4460c50af43322bcfc8e13d3301a1f1003ceb6");
roots.back().stableEndpoints.push_back(InetAddress("195.181.173.159/443"));
roots.back().stableEndpoints.push_back(InetAddress("2a02:6ea0:c024::/443"));
我们需要做的就是将这4个节点注释掉,添加我们自己的planet节点,例如:
// 上海服务器
roots.push_back(World::Root());
roots.back().identity = Identity(""); //这里填identity.public文件的内容
roots.back().stableEndpoints.push_back(InetAddress("47.102.205.100/9993")); // 这里填公网ip和端口
其中,identity的值可以通过
cat /var/lib/zerotier-one/identity.public命令查看
stableEndpoints与前面配置moon节点时所填相同,IPv4和IPv6均可,可以push多个
3、编译并生成planet文件
cd ZeroTierOne/attic/world
./build.sh && ./mkworld
# 此时会生成一个名为"world.bin"的文件,就是我们要的planet,将其重命名
mv world.bin planet
如果使用
build.sh编译时报错:In file included from ../../osdep/OSUtils.cpp:45: ../../osdep/OSUtils.hpp:46:10: fatal error: nlohmann/json.hpp: No such file or directory则需要先将
ZeroTierOne/ext/nlohmann复制到/usr/local/include/目录下再重新编译。
现在,我们只需要将planet文件发放到各个节点(包括planet节点、moon节点和leaf节点),替换原有的planet文件,并重启Zerotier-One服务即可。
sudo systemctl restart zerotier-one.service再次查看节点情况:
sudo zerotier-cli peers可以看到仅剩一个planet节点,且ip和端口都是我们刚刚自己配置的,说明操作成功了。
